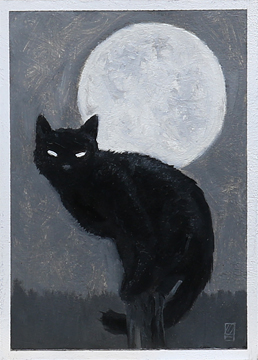
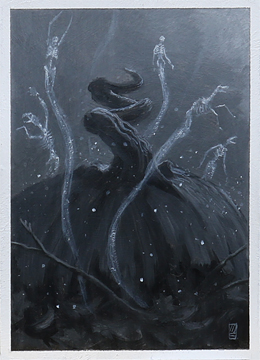
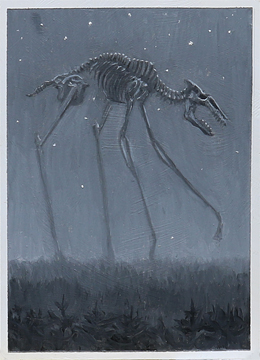
I have been invited to showing at the Nucleus Gallery featuring miniature paintings on the back of Magic cards. Looks to be starting on April13,2024 to April 28, 2024 with a long list of well known artists and all cards are on sale. My six are these.
The model was placed on a flat surface along with various additions, lights and photographed. Seems like an awful long process to achieve a believable image of an unbelievable occurrence. Certainly, there was lots of fun along the way. If I had been born closer to the millennium , I likely would be creating this in a 3-D program as is the way these days. However, I am from a time when things were still being done by hand, you know, analog type stuff. Looking and working an object on a screen is cool but there is no comparison to holding something you actually built in your hands. Please click on below image for better visualization.
So this is the last series of bits before completion. The first picture shows the back side to actually see what this is made of, sort of like going back stage. The door was painted and weathered using various techniques. Addition of plates and locks to the door along with stainglass windows. These were placed and then a bit of paint and pastel dust to tie it all together. This was certainly way more rewarding than the time invested. I learned a lot which will no doubt be put to use with future projects. If you have any questions, please feel free to let me know.
This post shows the addition of the stairs and various painting stages. Some old log chunks have been created to fit the holes in the face of the building. You can see the foam showing through areas where I have cut back to add more or different detail or larger structures such as the stairs. Changing and adding detail and even changing the basic shape is very simple. Wood putty can act as coverage and glue. A simple utility knife does most of the work at this stage.
Roughing up of surfaces before application of glue or wood putty is simply a necessity. Toothpicks between pieces is dependent on sizing. Large and very small pieces tend to get toothpick support. I do have a tendency to overbuild supporting structures.
So we left last time with the wall being built up to a thickness of three. This concept being a science fiction piece, there will be floating stones about the door structure. A couple of pics deciding on size , balance and position of said stones. After that, it’s time to dress the face of the doorway placing details. This was done with thinner foam blocks around the doorway and foam board. The foam board has had the outer paper stripped off. You can see it being used for large flat surfaces of the wall portions. I did this to expose some of the underlying foam and roughen the remaining paper surface so the wood filler wood have a something better to grip onto.
First layer application of wood putty is fairly thin and is simply meant to bind everything together. It laid down quite simply with little overworking and left to dry. The next session, I applied a much thicker layer over the surface. Now I have enough depth to carve out underlying structures of bricks and stones and get after chipping the exterior masonry. This process is very give and take as too much can suddenly pop off from to vigorous an approach. A mix of pva and wood putty is the usual fix for broken parts or additions at this stage. This makes for a for quite a strong bond. This however requires another good 8 hours of drying before I can star to rework the area. You could start sooner but it is just better to make sure it is rock solid before starting again. Impatience doesn’t help this process whatsoever.
Generally, things go smoothly and I allow what is working out at the time to direct my energies. Basically, if it looks good then it works for me. The carving work is done mostly with water and number 15 scalpel blades and I go through a few of them.
Last time, we got up to a basic shape, not much more than a silhouette really. I did some work with a ruler, drawing in possibilities, trying to determine a direction. Setting up components to see what it looks like at this stage. The brick wall, seen in the fourth picture, is an old 1/12 scale brick wall I built for practice sometime ago. It is going to be cannibalized into the scene as rubble mostly.
I decided that the wall, itself, was not thick enough so I made it three layers thick of one inch pink foam. Pva glue applied to roughened surfaces with toothpick stabilizers accomplished this nicely. The thickness was created with broken stonework in mind and roughed in with the wood putty. 1/12 scale. Foam, pva glue, wood putty. As usual if you have any questions, drop me a line.
In process of making a 1/12 scale diorama. It is a ruined section of wall. It will have a door and window setup that I hope to do in leaded window style. If i can pull that off it should really help to sell the illusion. I will be posting a lot of pictures of process. Nothing I am doing here is fabulously weird. I expect the pictures will pretty much speak for themselves. However, if’n you see something mysterious that you cannot fathom and want to know, drop me a line.
This is the first of many posts about this project as it has a bit of a different ending in mind.
Material: 1/8 inch luan, tongue depressors, 1 inch pink foam, lo-temp glue, wood putty
The last grouping for January 2022 is a mixed bag of color and grisaille. Oil on primed substrate. 3.5×2.5 inches. On the back of magic card artists proofs.